Building the Ultimate Lumber Cart

Updated: April 2024
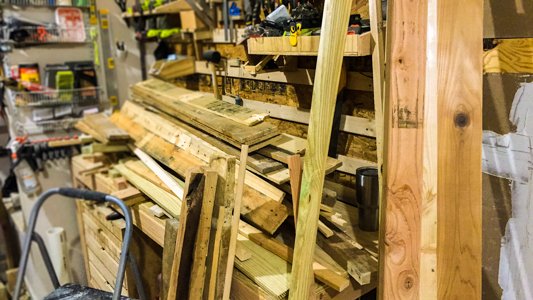
A Lumber Cart is one of the first major shop projects I recommend to anyone just starting. Once I began getting into woodworking and making, I started accumulating building supplies with no storage options. I often purchased more than I needed or had large off-cuts from builds. In addition, I also had a friend start supplying me with pallet wood. This wood needed to be stored in various ways, taking up as little space as possible.
I have FREE Giant Lumber Cart plans if you want to build your own.


Problem to Solve
To optimize space in a garage shop, I need to be able to store material in a variety of ways:
Vertical wall for full sheets of plywood
Flat shelves for storing long lumber flat
Bins for storing longer offcuts vertically
Non-restrictive space for odd-shaped cut-offs and scraps
Affiliate links are used on this page. See my disclosure page for info on affiliate programs.
Tools Used
Right-angle Drill Attachment (better one linked)
* While these are the tools I used for this project, I would not recommend the Ryobi Table Saw or Jigsaw.
Materials Used
2x4s
23/32” Plywood
1/2” Plywood
#8 3” Deck Screws
#8 2” Deck Screws
5” Locking Casters
1 - Cut Vertical Joinery
While the Lumber Cart bottom frame is usually where I would start, the vertical pieces need to be very well secured to the frame. A mortise and tenon seemed to be the strongest option, but I wanted the tenons to be a little thicker. To accomplish this (and make for easier cuts), the mortise would be made from two half-laps together with two different 2x4s.
First, I cut the six frame braces that need half-laps. Second, I cut all six vertical pieces to size, ensuring 15-degree angles on the end. These were all cut on the miter saw. On the vertical pieces, I cut the tenons first. Fortunately, these were easy to knock out with a circular saw and chisel.


After marking each vertical to ensure it was distinct, I individually marked the half laps on the bottom frame. Each was cut on the table saw with an angled miter gauge and several passes. Finally, I made sure to dry fit each tenon so the fit would be perfect and the Lumber Cart would be as strong as possible.


Before moving on with the frame, I adjusted the miter gauge to square and cut the half-laps used later when assembling the full upright frame. This is much easier to do before the entire Lumber Cart is assembled.
2 - Assemble Bottom Frame
The last components needed for the bottom frame are the long braces and non-mortise cross pieces. To start, all four components were cut with the miter saw.

Before attaching it, I laid out and dry-fit all the components. For the cross braces with half-lapped mortises, I picked one of the sides to attach with the bottom but marked the corresponding half to ensure they were all kept straight.
The bottom frame was assembled using Titebond II glue and 3″ deck screws. All screws were pre-drilled and countersunk before driving in.
Although the Lumber Cart frame is not 100% complete, at this phase, it is easier to move to the floor and uprights before finishing the bottom frame.
3 - Join Verticals & Bottom Floor
With the bottom frame mostly assembled, I moved on to the plywood floor. First, I used my circular saw to rough cut to over-sized dimensions from 23/32″ plywood. Two sides of the ply had the factory edge, so I used these to square up to the frame and mark the locations where the verticals would pass through. Next, I used my jigsaw to clear out these holes.
To attach, I used the two factory edges to square two sides before attaching with glue and 2″ deck screws.


I waited a little bit for the glue to mostly dry, then returned with my router and used a flush-trim bit to make the bottom floor flush with the frame.
After the bottom was attached, I flipped the Lumber Cart on its side to access the top and bottom simultaneously. I installed each vertical individually by first applying glue to the mortise. This let me insert the vertical through the floor and clamp the tenon into the mortise. For ones that needed more persuasion, I used my homemade mallet.


Once I had both verticals installed on a frame cross piece, I applied glue to the corresponding frame brace and used clamps, a mallet, and screws to make the assembly permanent. Subsequently, this was repeated for each of the three sections.
4 - Install Casters

The complete bottom frame and verticals add serious weight to the piece. Since the Lumber Cart was already on its side, this was a perfect time to install the four 5″ locking casters. I installed each caster in the corner with 4x 3″ screws and washers each.
Finally, once these were installed, I flipped the whole cart upright.
“PRO TIP
When you install casters while the Lumber Cart is on its side, lock all the casters before turning upright. Most importantly, this will prevent the piece from shifting and becoming difficult to manage.”
5 - Assemble Horizontal Half Laps
While the uprights are secured, the entire upper frame must be completed. First, I cut the four horizontal braces to size on the miter saw. Then, I used the uprights to mark the half-lap locations.
Once marked, I used the table saw with a miter gauge to cut the half-laps using multiple passes.
Lastly, each joint was coated in glue, assembled with clamps, then drilled and screwed permanently with 2″ screws.


6 - Cut & Assemble Top Braces
I wanted to ensure the tops of the verticals were completely secure. To accomplish this, I cut a brace for each pair. First, I cut the overall length at the miter saw, then a 15-degree rabbet on the sides so the brace would sit perfectly on the verticals. Next, I marked the middle of each and cut half laps on the top.
The braces helped to keep the verticals perfectly square to the cart as a whole. After applying glue to the rabbets, I used a few clamps to keep everything secure before pre-drilling and driving 3″ screws to attach the braces.


With the braces attached, I applied glue to the half-laps and installed the final horizontal brace with 2″ screws. The Lumber Cart frame is now complete!
7 - Install Shelves
It would be easiest to install the shelves before completely enclosing the Lumber Cart middle section. First, I cut a 2×4 in half at a 15-degree angle to create an angled 2×2. This allows the 2x2 to act as a cleat for the shelf and sit flush with the verticals. Finally, I attached it to the frame with glue and 2″ screws.


For each shelf, I independently verified the width each shelf needed before cutting 23/32″ plywood at the table saw. Each was then installed with glue and 2″ screws to the cleats.
Finally, the top shelf does not need a cleat and is secured to the top brackets and 2×4 horizontal brace.
8 - Cut & assemble ply railing
On the ply side, I decided not to add a solid wall on the vertical frame. I often have larger offcuts on this side, if not full sheets of plywood. Consequently, a wall is unnecessary as it takes up valuable space.
I wanted to install a removable rail and bottom cleat. Both will keep the plywood from falling off the rack, whether it is stationary or moving around. Fortunately, both can be created with two 2x4s. The first 2×4 was ripped into two 2x2s on the table saw.
For the floor cleat, I left the flat side and installed it on the floor with screws only. Although I don’t anticipate ever removing the cleat, I wanted to have the option if needed. It was installed with heavily countersunk 3″ screws. I did not have a fostner bit to sink these properly. However, the countersink bits I have worked very well.


Next, for the rail, I used my router and a round-over bit to round over the flat corners on the 2×2. This will make it much easier to handle without tearing up my hands.

Next, I used the miter saw to cut the second 2×4 down to create the rail supports. Then, I used the 2×2 to mark a notch on the supports and cut these out with the jigsaw. I also made sure to give it some additional room so it would seat easily and be easy to remove when needed.
Finally, I installed the supports to the frame with 3″ screws and no glue, again in case I needed to remove the rail for any particular reason.


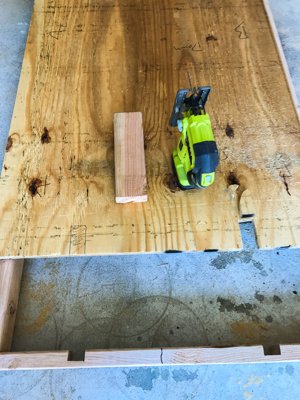
To keep the rail from falling, I needed some caps. Fortunately, I had some circle scraps from when I helped a friend cut holes that were approximately hockey puck size. These scraps were used to create small caps on the ends of the rail. These were attached with 2″ screws.


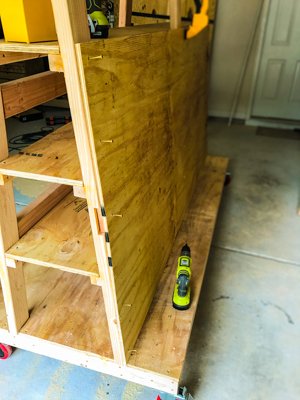
9 - Assemble Bins
On the bin side, I measured the distance from the Lumber Cart floor to the top second to the top shelf along the verticals. This gave me the width of the ply wall. Then, I cut this out of 15/32″ plywood and installed it with glue and 2″ screws.

After the wall was installed, I measured the bottom of the frame to the edge of the wall and estimated the distance from the top of the bin to the wall. Helpfully, this gave me the exact angle each bin needed to have on one side to be perpendicular to the floor and also connect to the wall.
Unfortunately, I did make a mistake in my assembly steps, but here is how I did it.
First, I cut the long front and bin walls with the circular saw and straight edge. Next, I used my Kreg pocket-hole jig to drill pocket-holes for the bin to connect to the floor and vertical wall. I used glue and pocket-hole screws to install the long wall to the bottom frame. Once the long wall was installed, I did some weird angling to install each bin to the vertical wall, long wall, and floor with glue and pocket-hole screws.
What I should have done was install the bins first. This would have allowed me to make better connections while the glue dried and not struggle to attach each bin component. Then, very simply, I would have attached the long wall to the bin walls.


Conclusion
The Lumber Cart was a massive build, and I learned a great deal from it. I tried several new joinery methods for combining 2×4 and plywood. Most importantly, I learned a good bit about designing a piece to solve fairly specific problems. This cart is very heavy. I should have added non-locking casters in the middle to lighten the load on all casters. If I ever unload the cart, I will add these.
Later, I discovered I should have added a large chamfer to the plywood rail supports. The bottom of these occasionally interferes with the casters' locking mechanism; the chamfer would eliminate this.


There is a ton of storage in this. It is vital not just to toss random scraps on the cart and let them get out of control. If you do this, you will end up frustrated again (not that it happened to me after building…..). Just ensure you only keep scraps you will use for projects and not every little thing just because you have a huge cart.


