A Unique Tray for Organizing LEGO with Style
Last Modified: October 2024
For LEGO enthusiasts, some dump & find, and others knoll the pieces into organized groups. I am a proud knolling organizer, but that also presents a problem. How can I keep my LEGO pieces organized but still mobile? The answer is to make a LEGO Tray incorporating leather to keep the pieces in place and provide a satisfying isometric grid. My friend Etan Carter was a HUGE inspiration for incorporating leather into projects.
Affiliate links are used on this page. See my disclosure page for info on affiliate programs.
Materials
Padauk Hardwood
Maple Hardwood
1/4” Plywood
1 - Laser Engrave Leather
I wanted an isometric grid and a custom logo on the leather portion of the tray. I created a file for my laser that would engrave the grid and the logo and finally cut the logo out. Cutting the logo out will be easier than trying to keep the dye off it later and will also add some contrast to the tray. Plus, peeling the protective tape off the leather is always satisfying.


Lastly, I cut the leather to its final size. I could have cut the leather on the laser as well, but wanted the piece to be as large as possible, which was larger than my laser can cut.
2 - Reinforce Leather Tray

The leather is thick but not sturdy enough for the tray's bottom. I cut a piece of 1/4” plywood to the same size as the leather, then used contact cement to laminate the leather and plywood together. When using contact cement, apply a thin layer to both surfaces, wait for it to dry enough to be tacky, and then carefully put the pieces together. Once the two sides touch, they are challenging to pull back apart. I used painter’s tape to align the pieces, so the lamination wasn’t quite as stressful.


3 - Dye Leather
We'll need to dye the leather to get a classic brown. Using a cloth stain pad, I carefully spread the dye on the isometric gride piece of leather. Keeping streaks to a minimum was tricky, but I found that two light passes were better than one heavy pass.


Once the dye dried, I added the undyed leather logo with contact cement. Finally, buff on a layer of wax to protect the leather over many Lego set assemblies.

4 - Breakdown Hardwood
To bring in some of the classic colors associated with Lego, I decided to build the sides of the tray out of red padauk and light maple hardwoods. The hardwoods should also be resilient against wear from use over time. Before cutting each piece to size, I need to dimension the lumber. Ideally, I’d use a jointer to square one face and one edge first, but I do not have one. Instead, I used my thickness planer to get one face flat, then planed the other side to the final thickness.


I cut each piece slightly longer than I needed at the miter saw. Having smaller pieces will make the jointing easier.
I used my jointer sled at the table saw to cut one edge square. Then, I could rip each piece to the final width.


5 - Cut Tray Slot Joinery
The tray needs to slot into the frame to withstand continued use. Usually, I would use my dado stack to make the groove cuts. However, since the tray bottom is so thin, I decided to sneak up on the cut with my regular table saw blade.
I also added a slight chamfer to the edges of the leather and plywood lamination. The chamfer will make it easier to fit into the groove during the glue-up.


6 - Design & Cut Handles
Lego inspires the tray, and I wanted that theme to flow even to the handles. I sketched a blocky handly that we might see in a Lego brick tray to accomplish this. Once drawn on each piece, I cut the handle with my bandsaw. I also decided to cut the top completely off and re-glue the top of each handle back to the bottom later.


After the handle glue dried, I smoothed the handles with chisels and wood files.
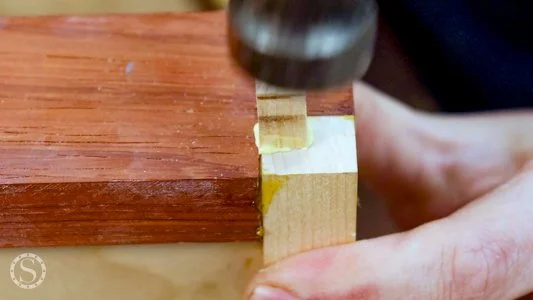
7 - Cut Tray Frame Joinery
Keeping with the Lego inspiration, I decided to try box joints for the first time. At first, I used my handsaw and chisels to cut the joinery. However, I remembered I had a bandsaw I used in the last step and switched to it. I still needed to fine-tune the joints with a chisel, but the fit wasn’t bad for my first attempt.


8 - Glue Up
The glue-up was relatively simple for this one. I spread the glue, pushed the pieces together, and clamped them.


The only oddity was having to fill the groove holes on four sides. I made a square plug at the bandsaw, sanded it until it fit well, and glued it in.

9 - Adjustments & Finish
After the glue dried, I noticed that not all my frame edges weren’t completely flush. I used a handsaw to get them close and a sander to make all corners flush and smooth. I also sanded everything up to 320 grit.
Applying the finish was very satisfying. I used an oil and wax finish that was easy to spread and allowed it time to dry. Once the finish was applied, I wiped the excess off and buffed the surface after it dried.


Knolling Lego bricks is one of the most satisfying things about the hobby, aside from actually building the sets—at least to me. Now, I can lay out my pieces, move from room to room, and set the pieces aside if I get interrupted. I have also used the tray for other non-Lego projects to keep things together as I moved from place to place. It has become a tray that I enjoy using but also looking at when it’s not in use.

